How to install artificial grass
Contact Us
For more information or to book an appointment:

How to install artificial grass
How To Replace Your Existing Lawn with Artificial Grass
Before you start, do you have the right tools?
- T Square
- Spade shovel
- Flat shovel
- Hammer
- Straight edge – 48” or more
- Leveling rake (loot rake)
- Wheelbarrow
- Pressure treated woodwork, edger or bender board – for use around flower beds
- Vibrating compactor and hand tamper
- 6” Spiral Galvanized nails – 1 nail placed every 10” around perimeter of lawn and
8″ offset on seams - Seam Tape and adhesive – if needed
- Power Broom or stiff hand broom – for brushing up the turf after installation
- Silica sand (optional)
- Pet deodorizer infill (optional)
- Tip: Roll out your artificial grass in the sun prior to installation. Heat helps raise the turf blades.
Step 1: You can rent a Sod Cutter to remove your lawn or use a shovel to excavate your soil to a depth of 5 to 6 inches from the height of the sidewalk, driveway or any area you want your new lawn to be level with. This would be the time to build up the area if it is sitting low.
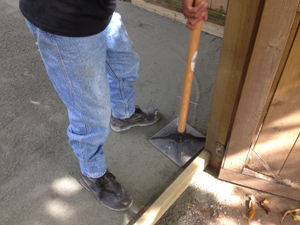
Step 2: Where there is not an edge to butt the grass up to, use some treated wooden ties, bender board or garden edger. Alternatively create a concrete block edge to establish a frame around the area to be covered with artificial grass. This will create a boundary around the perimeter so the base prep remains stable.
Step 3: Backfill your excavated area using a rock dust, like road base or crusher dust. Your base must allow drainage and be able to become a hard firm surface. Use the following Landscaping Fill Calculator to determine how much base material you will need.
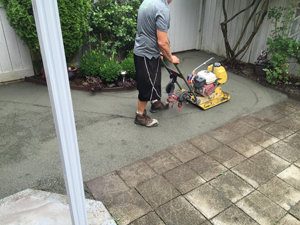
Step 4: When filling in your base material compact the sand every few inches by using vibrating compacter plate. A hand tamper can be used in hard-to-get areas like corners. The area needs to be porous, but firm. We recommend renting a vibrating tamper machine to ensure the area is firmly compacted. For best results mist the first 2 inches with water while compacting. Repeat the misting process throughout.
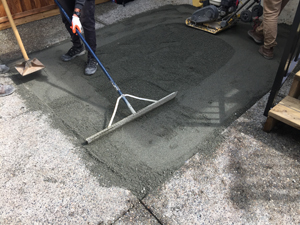
- Tip: To level the area use a wooden 2″ x 4″ by 6 feet, sliding the wood left and right pulling towards you across the surface. You can also use a wide levelling rake, which can be rented.
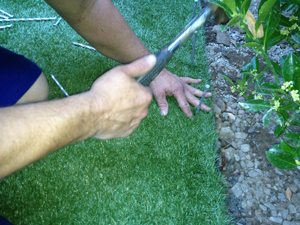
Step 5: Unroll your artificial lawn over the base prep. Always make sure you check the pile direction of your artificial grass as it must all be installed in the same direction. This is when you double your measurement and cut the grass to size
Step 6: Your final step is to brush up your new turf with a stiff broom. For best results, rent a power broom. After brushing up your lawn you now apply pet deodorizers, like Pure Zero or Silica Sand. These are both optional.
Step 7: If you have pets, it is recommended that you use a pet deodorizer, Pure Zeo, which helps breakdown pet urine, reducing smells, keeping your artificial grass smelling fresh. You can double up your protection by adding a skim coat onto the base prep. Add Pure Zeo on the surface of the artificial grass as well. Brush in Pure Zeo evenly though the surface of the turf using a stiff broom. Water in your Pure Zeo to facilitate the pellets getting down to the base of the turf. The surface addition of Pure Zeo is the final step after installation of the artificial grass.
Step 8: Your final step is to brush up your new turf with a stiff broom. For best results, rent a power broom. After brushing up your lawn apply pet deodorizers (see step 5).
How to install artificial turf on a patio, balcony or rooftop
- Tip: Step 2 and 3 may not be necessary in all cases
Step 2: If your installation surface is uneven you should level it off. This can be done by adding roofing singles to the low spots and is an cost effective way to achieve a level surface. Use a straight edge or level to ensure you do not have any high spots. Roofing shingles are easily cut to the size needed by using a utility knife.
Step 3: If you have an area that is exposed to the elements it is recommended that a drain mat is installed between the surface and the artificial turf. The drain mat needs to be a few inches away from the edges where the grass will be installed. The drain mat is kept inlace once the artificial turf is installed.
- drains mat creates air space between the base and your turf and allows rain water to channel away.
Step 4: You are now ready you install your arrival turf. Lay you turf it in the sun prior to installation. This makes the turf more flexible and easier to install. At this point you should also use a shop vac or rent a power broom to brush up your turf. Doing this in an open area allows you to brush the entire surface including all the edges. This is not a necessary step but recommend
Step 5: If you need to make any seams you will need seam tape and glue. Double sided indoor/outdoor tape can also be used. The seams need run the same direction and match the same stitch width as the rest of the stitch lines (back of turf)
Step 6: If your area has all sides with edges you can lay the turf down without gluing or double sided tape as it is unlikely to move as the edges keep it in place. If you have an open edge you will need to use double sided tape or apply grape sized glue tabs (10 inch apart) to secure the turf. Securing a turf edge is only needed on the open edge.
Step 7: Use a shop vac or home vacuum to clean your newly installed turf which will pick up any debris from the installation process.

- Maintenance of your artificial lawn PDF for printing
- Installation of your artificial lawn PDF for printing
- Installation of an artificial lawn on a deck or balcony PDF for printing